
 Creating Critters
Project Summary
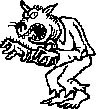
Two classes exchange writing and art: one class describes real or imaginary
"critters", and the other draws pictures of the critters taken from the
description.
Critters can be created in a variety of ways. One way is to have each student in Class #1 write a description and each student in Class #2 create a critter. Since it's not always easy to match descriptions with pictures, a better way is to have students work in small groups of 2-3. This reduces the number of files to exchange electronically. You may also want to try having both classes write descriptions and create graphics.
This project can be easily conducted across grade levels. For example, junior high students can write descriptions and elementary students can draw graphics by hand or use a computer graphics program.
Unless hand-drawn pictures can be scanned, they can be sent via postal mail. While this may slow the project down, it is very workable.
Suggested Grade Level and Audience
3rd through 9th
Estimated Time Required
3-6 weeks
Student Learning Objectives
- To develop and improve descriptive writing
- To develop creativity and enthusiasm for writing
- To focus on the importance of details
- To practice word processing and graphics editing
- To engage in a cooperative creative writing exchange with a distant school
Writing Prompts
Writing Situation
Class #1 writes original descriptions of critters, and sends the descriptions
electronically via modem to Class #2. Then, Class #2 creates pictures of the critters,
from the written descriptions.
Class # 1
Your assignment is to create a description of a critter or creature. You must be as
precise as you can. Describe the critter in three sections.
First, tell what the head looks like. How big is it? Describe the shape, color, size and appearance of hair, ears, horns, eyes, mouths, noses, and so on. Maybe your creature has more than one, describe each.
Second, tell what the body looks like. What is the shape, size, and color?
Third, tell what the legs looks like. How many are there? Are they hairy, scaly, smooth, or shiny. Are they long or short?
Finally, go back and read your description. Do you think someone could draw your creature by reading your description? Would two different people draw a critter that looked pretty much the same from your description? If so, then the only thing you have left is go back and make sure all the spelling and punctuation are correct.
Class #2
Your assignment is to take the written descriptions of the creatures that Class 1 thought
up, and draw a picture that looks like the written description. You may use any
appropriate computer drawing program, or draw them by hand.
We recommend Print Shop Companion Creature Maker...
First, select the head, body, and legs that come closest to the written description you have been given.
Then, switch to the GRAPHIC EDITOR portion of Creature Maker. Now comes the real challenge! Use all the commands available in the GRAPHIC EDITOR, to modify your creature to look like the written description. The commands you will find most handy are Draw, Erase, Oval, Line, and Patterns.
When you have drawn your critter so that it matches the description, print it out and attach it to the description. Send a copy to Class #1.